What is RTE?
Replay Test Engine is a tool within your SAP system designed to simplify and automate the testing of changes in your ABAP programs or to verify the impact of configuration adjustments. It works by capturing key data from your program at a specific point, saving it as a "reference", and then allowing you to compare this snapshot against data captured from later runs of the program. This helps you quickly and accurately identify what has changed.
Who is RTE for?
RTE is valuable for a range of SAP users:
- ABAP Developers: To perform regression testing after code modifications, ensuring new features work and existing functionality isn't broken.
- Functional Consultants: To verify that configuration changes produce the expected outcomes and to check for unintended side effects.
- QA Testers: To streamline test execution, automate comparisons, and get precise details on data differences.
- Key Users: To execute pre-configured tests (instrumented by developers/consultants) to validate business processes after system updates or changes.
The Basic Workflow
- Tell RTE What Data to Watch: Add a simple line of code to your program to specify which variables' contents RTE should capture.
- Create a "Before" Snapshot: Run your program via RTE using provided business scenarios (variants) before any changes to save the current state of the specified data.
- Make Your Changes: Modify your program code or implement your configuration adjustments.
- Compare and Analyze: Run your program again using the same variants via RTE after the changes and use RTE's compare function to see what's different from the "Before" snapshot.
- (Optional) Approve New Baseline: If the changes are correct and the new data is the desired state, you can mark the "After" snapshot as the new "Before" for future tests.
Step 1: Telling RTE What Data to Watch
To let RTE know which data to capture, you need to add a small piece of ABAP code to the program you want to test.
- Where to Add Code: Place this code at a point in your program's logic where the variable you want to test contains the final or relevant data for your comparison (e.g., just before data is displayed or saved).
-
The Code:
zcl_rte=>export_data( iv_var_name = 'FINAL_ALV_DATA' i_data = lt_output ).iv_var_name: Choose a logical, descriptive name. This name will appear in RTE when you view or compare data. It must follow ABAP variable naming rules (no spaces, limited special characters).i_data: This is the actual data object (internal table, structure, or elementary variable) from your program whose content you want RTE to capture.
See Chapter 2 in the full manual for more details.
Step 2: Creating a "Before" Snapshot
Now, let's capture the current state of your program's data before you make any changes.
- Go to SAP Transaction:
ZRTE_START. You'll see the main RTE screen: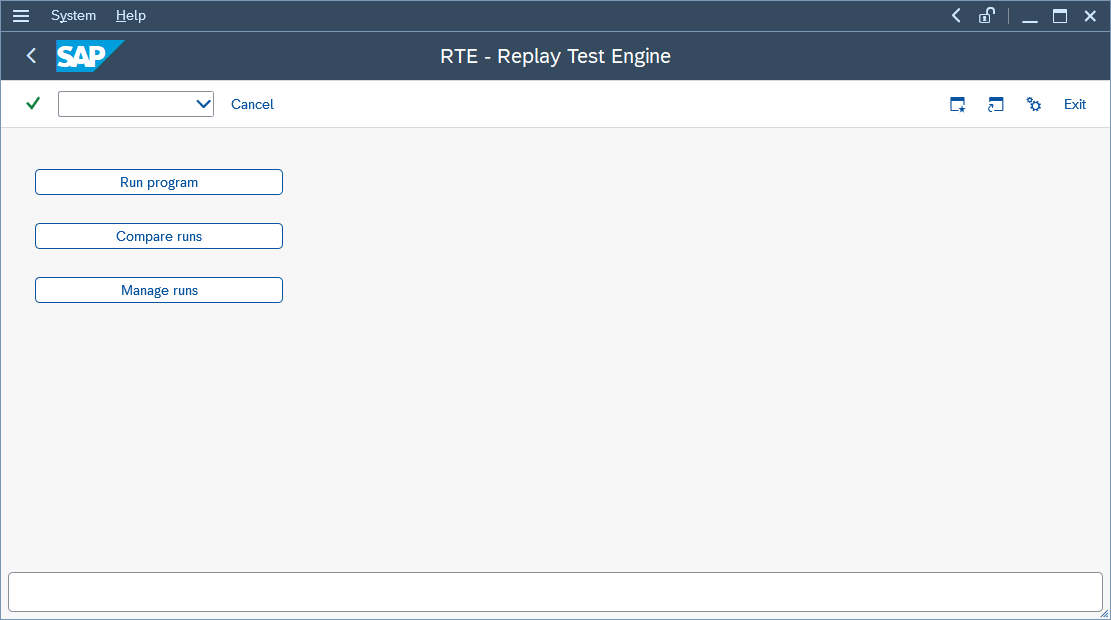
- Click on "Run program". The "RTE: Run program" screen will appear:

- Program: Enter the technical name of your SAP report (program) you wish to execute.
- Variant: (Highly Recommended!) If your program has a selection screen, use a saved variant. This ensures the program runs with the exact same selection criteria and parameters each time, which is crucial for reliable comparisons. If your program has no selection screen, or you choose not to use a variant, you can leave this blank (the selection screen will appear if it exists).
- Description: (Optional but helpful) Provide a meaningful description for this run.
- Is reference run?: Check this box! This tells RTE that this specific run represents the correct, expected output (the "golden copy") against which future runs will be compared. If a reference run already exists for this specific Program and Variant, RTE will prompt you for confirmation.
- Choose "Yes" to set the current run as the new (and only) reference run for this program/variant. The old one will no longer be the reference.
- Execute (by pressing F8 or clicking the Execute icon). Your program will run. After it finishes, RTE will display a summary screen showing the variables that were successfully
exported during this run:
- You can immediately inspect the data captured for any variable listed. Simply double-click on the row. For an internal table, it might look like this:
You have now created your reference run! This is your trusted baseline.
See Chapter 4 in the full manual for more details.
Step 3: Make Your Changes
Go ahead and implement your planned modifications to the program code, or make your configuration adjustments in SPRO or other relevant areas.
Step 4: Compare and Analyze
After making your changes, it's time to see what impact they had by comparing the program's new output to your reference run.
- Go to Transaction:
ZRTE_START. - Click on "Compare runs".
- For a typical "before vs. after" check on the program you just changed:
- Comparison Mode: Select "Reference program all variants" (this will test all reference scenarios you've set up for the program). Alternatively, choose
"Reference program/variant" to test only one specific variant.
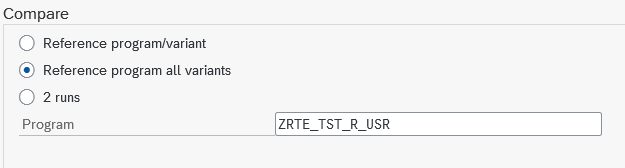
- Program: Enter the name of your SAP program.
- Comparison Mode: Select "Reference program all variants" (this will test all reference scenarios you've set up for the program). Alternatively, choose
"Reference program/variant" to test only one specific variant.
- Execute (F8). RTE will:
- Locate the reference run(s) you created in Step 2 for this program and its variants.
- Re-execute the current, modified version of your program using those same variant(s).
- Compare the data captured during these new executions against the data stored in the corresponding reference runs.
-
Understanding the Results Grid: RTE will present the outcome in an ALV grid. If no changes affected the exported data, it might look like this:
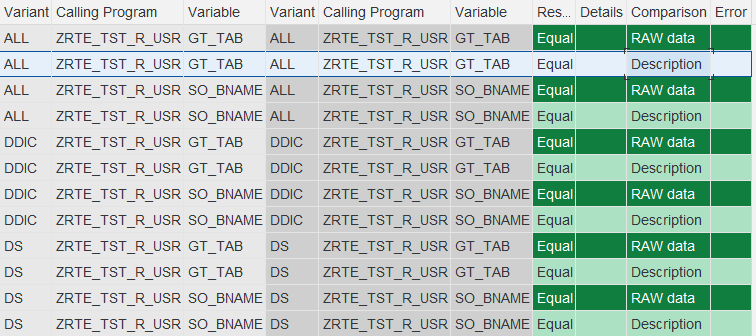
-
ResultColumn: This is the key column.Equal(Highlighted Green): Perfect! The data (or structure, depending on comparison type) is identical between the reference and the new run.Not equal(Highlighted Yellow): A difference was detected. The data or structure does not match. Further investigation is needed. Example:
Missing(Highlighted Orange): Indicates that the variable was found and exported in one of the runs but was not exported in the other, or vice-versa. This often points to changes in the program logic controlling theexport_datacall.
- Seeing What Changed (Using
iDataoption): The default "RAW data" comparison (shown above) is fast but only tells you that something changed, not what changed. To see the actual data differences, you need to use theiDatacomparison:
-
- On the "Compare runs" selection screen (before executing), check the "Advanced options" checkbox.
- Click the "Comparisons" button that appears.
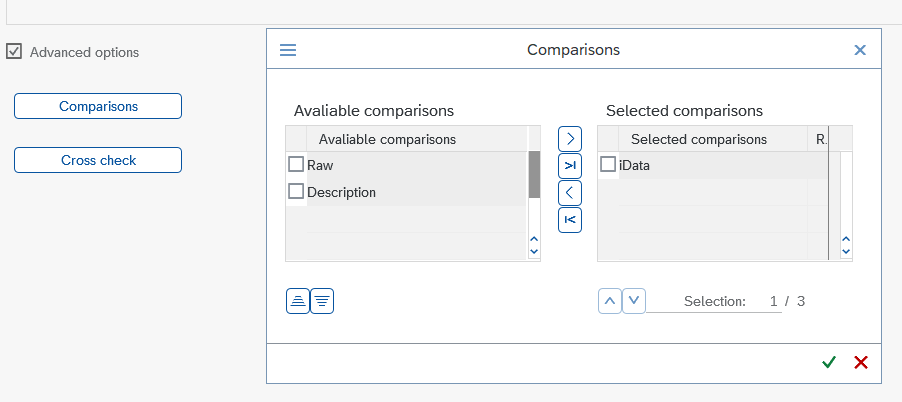
- A configuration pop-up appears. Select
iDatain the "Available comparisons" list. For clarity, you might unselectRawandDescription. - Now, re-execute the comparison from the main "Compare runs" screen.
- The results grid will now show the
iDatacomparison. If theResultis "Not equal", critically, theDetailscolumn for that row will now display a magnifying glass icon. - Double-click the magnifying glass icon associated with the "Not equal"
iDatarow.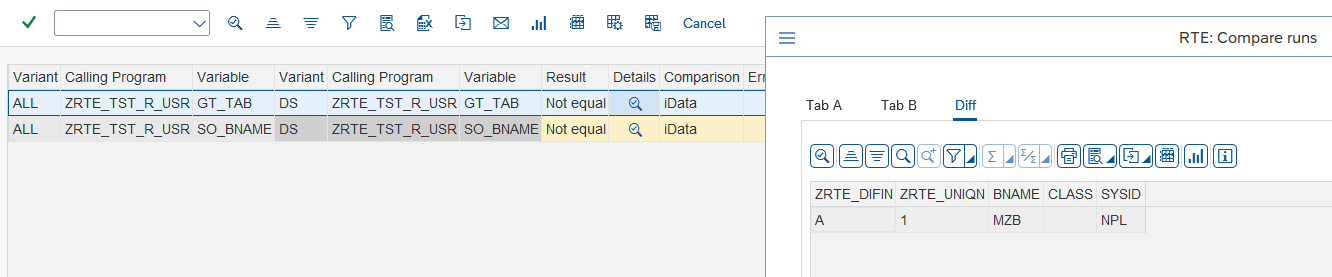 A detailed comparison window pops up. The
Difftab is often the most useful as it highlights only the discrepancies (e.g., changed values, added/deleted rows) between the reference data (Tab A) and the new run's data (Tab B).
See Chapter 5 in the full manual for more details.
Step 5: Approving the New Baseline
Development and configuration are iterative. After implementing changes, performing comparisons, analyzing differences, and ultimately confirming that the program's current behavior is indeed the new correct baseline, your original reference runs might become obsolete.
RTE provides a streamlined way to update your baseline:
- Verification is Key: Before proceeding, be absolutely certain that the results shown in your current comparison grid accurately represent the desired, correct state of the program following your latest changes.
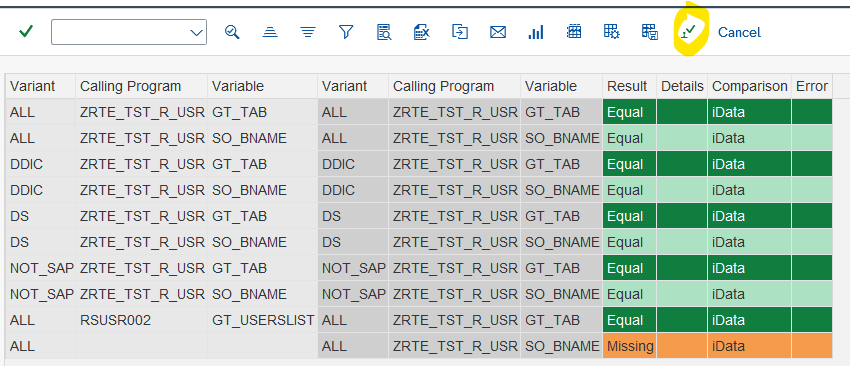
- In the ALV toolbar displaying the comparison results, locate and click the "Approve" button (depicted with a checkmark icon).
- Final Confirmation: RTE will present a confirmation pop-up dialog box. Click "Yes" only if you are completely confident that the current state is the correct new baseline. This action cannot be undone.
Consequences of Approval: When you approve, for each program/variant combination in the comparison, the run generated during that comparison execution replaces the previous run that was marked as the reference. This is highly recommended after verifying code or configuration changes, especially if data structures were altered.
See Chapter 5.7 in the full manual for more details.
Quick Tips
- Main Transaction:
ZRTE_START(for "Run program", "Compare runs", "Manage runs"). - Instrumenting: Add
zcl_rte=>export_data( iv_var_name = 'MY_VAR' i_data = lt_data ).to your program to define data for capture. - Reference Runs: Create them before changes using "Run program" and ensure the "Is reference run?" box is checked.
- Use Variants: For programs with selection screens, always use saved variants for consistent and repeatable test inputs.
- Compare: Use "Compare runs" (e.g., "Reference program all variants" mode) after making changes to check against your reference.
- See Differences: If the result is "Not equal," enable the
iDatacomparison type via "Advanced options" -> "Comparisons". Then, use the magnifying glass icon in theDetailscolumn and check theDifftab to see exact data changes. - Approve New Baseline: If the new results from a comparison are correct, use the "Approve" button in the comparison results ALV to make them the new reference for future tests.
This guide should help you get started with the basic regression testing and configuration verification capabilities of RTE. For more advanced features like detailed data mapping for structural changes, cross-program comparisons, and run management, please refer to the full RTE User Manual. Happy Testing!